Welcome to AUP Learning Cloud Documentation#
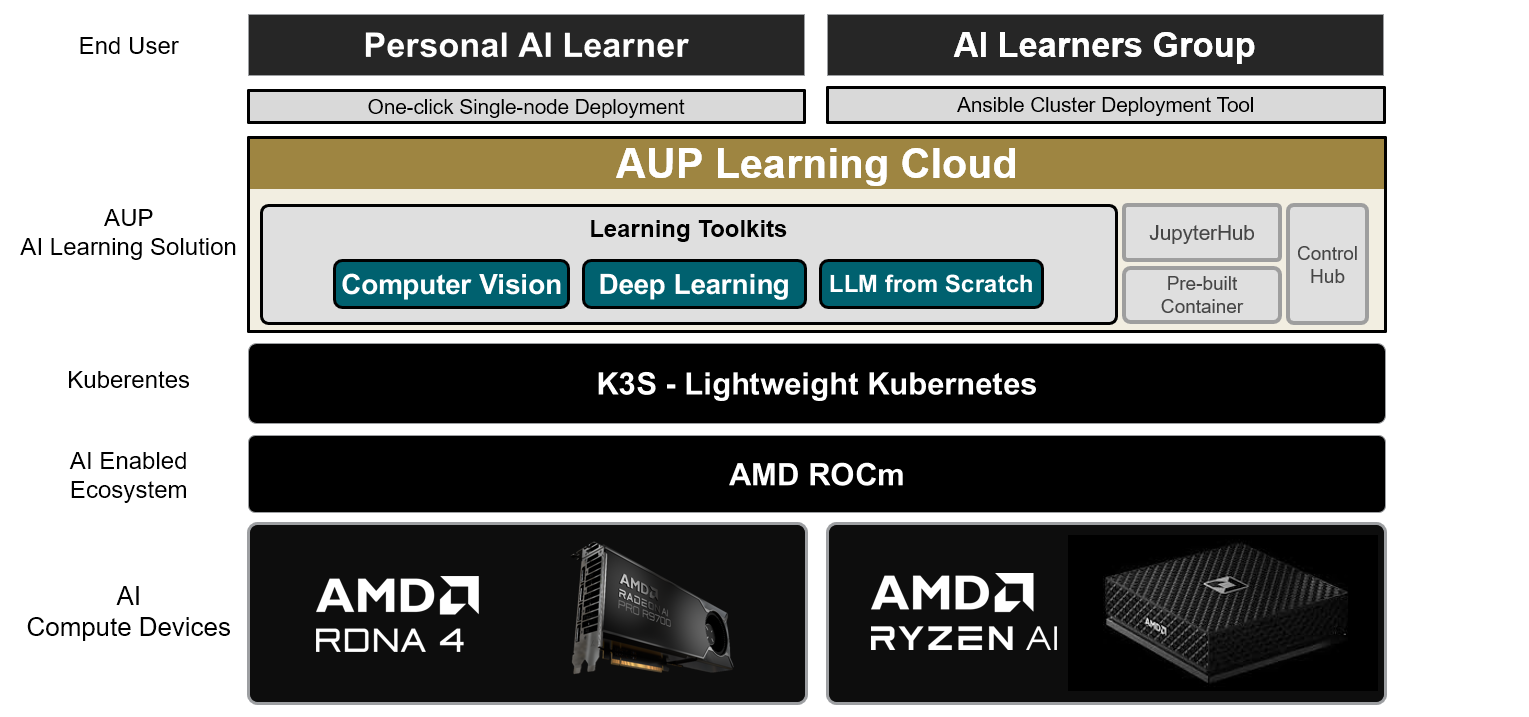
AUP Learning Cloud is a tailored JupyterHub deployment designed to provide an intuitive and hands-on AI learning experience. It features a comprehensive suite of AI toolkits running on AMD hardware acceleration, enabling users to learn and experiment with ease.
Installation
- Quick Start
- Single-Node Deployment
- Customizing a Single-Node Deployment
- Multi-Node Cluster Deployment
- Overview
- Prerequisites
- 1. Prepare SSH Access
- 2. Configure Inventory
- 3. Build The Cluster
- 4. Install kubectl / Helm On The Operator Machine
- 5. GPU Device Plugin And Labels
- 6. Storage
- 7. Prepare Images
- 8. Prepare The Multi-Node Values File
- 9. Deploy JupyterHub
- 10. Verify Deployment
- Access JupyterHub
- Operational Notes
- Troubleshooting
- Notes On Scope
- 3 Node Mini-Cluster Example
- Architecture
- What To Prepare
- Step 1 — Prepare The Service Machine
- Step 2 — Configure The Inventory
- Step 3 — Configure The PXE Controller Playbook
- Step 4 — Run The PXE Controller Playbook
- Step 5 — Verify The Controller
- Step 6 — Install The Single-Node K3s Server
- Step 7 — Publish K3s Credentials For The Agents
- Step 8 — Netboot The Agents
- Step 9 — Validate Agent Persistence
- Step 10 — Install The AMD GPU Device Plugin And Labeller
- Step 11 — Prepare Shared NFS Storage For Notebook PVCs
- Step 12 — Configure JupyterHub Values
- Step 13 — Deploy AUP Learning Cloud
- Step 14 — End-To-End Validation
- Troubleshooting
- Out Of Scope
- Scope and Limitations
Learning Toolkits
JupyterHub Configuration
Contributing